American National Standard
Test Procedure and Acceptance Criteria for Factory Applied Finish Coatings for Steel Doors and Frames
ANSI/SDI A250.3-2025
View PDF
Table of Contents
- General
- Scope
- Testing Laboratory
- Reference Documents
- Material
- Testing
- Salt Spray Test
- Condensation Test (Humidity)
- Accelerated Weathering Test
- Impact Test
- Film Adhesion Test
- Abrasion Test
- Acceptance Criteria
- Salt Srpray Resistance
- Condensation Resistance
- Accelerated Weathering Resistance
- Impact Test
- Film Adhesion
- Abrasion Resistance
- Report
Tables
Figures
1. General
1.1 Scope
These methods prescribe the procedures to be followed in the selection of material, chemical preparation, coating application, testing, and evaluation of factory applied finish coatings for steel doors and frames. Coatings covered by this standard include paints, stains, clear coats, and powder coats.
1.2 Testing Laboratory
All tests shall be conducted by an accredited laboratory.
1.2 Reference Documents
- ASTM B117-18 — Standard Practice for Operating Salt Spray (Fog) Testing Apparatus
- ASTM D523-14 (2018) — Standard Test Method for Specular Gloss
- ASTM D610-08 (2019) — Standard Test Method for Evaluating Degree of Rusting on Painted Steel Surfaces
- ASTM D714-25 — Standard Test Method for Evaluating Degree of Blistering of Paints
- ASTM D1654-08 (2016)e1 — Standard Test Method for Evaluation of Painted or Coated Specimens Subjected to Corrosive Environments
- ASTM D2244-23 — Standard Practice for Calculation of Color Tolerances and Color Differences from Instrumentally Measured Color Coordinates
- ASTM D2794-23 — Standard Test Method for Resistance of Organic Coatings to the Effects of Rapid Deformation (Impact)
- ASTM D3359-23 — Standard Test Method for Measuring Adhesion by the Tape Test
- ASTM D4060-19 — Standard Test Method for Abrasion Resistance of Organic Coatings by the Taber Abraser
- ASTM D4214-23 — Standard Test Method for Evaluating Degree of Chalking of Exterior Paint Films
- ASTM D4585 / D4585M-18 — Standard Practice for Testing Water Resistance of Coatings Using Controlled Condensation
- ASTM D4587-23 — Standard Practice for Fluorescent UV-Condensation Exposures of Paint and Related Coatings
- ASTM G154-23 — Standard Practice for Operating Fluorescent Light Apparatus for UV Exposure of Nonmetallic Materials
2. Material
2.1 — The test specimen shall be of the ASTM specification per ANSI/SDI A250.8 as used in the manufacture of the products. Separate specimens shall be used for each test. The specimen shall be a minimum of 4″ × 6″ with a 1/4″ hole at the center of the 4″ width, 1/2″ in from the end. Identification marks shall be added to the specimen as required for control purposes. The test specimen shall be handled at all stages of the process with clean gloves to prevent contamination.
2.2 — The specimen(s) shall be hung using a method representative of that used in production.
2.3 — The test specimen(s) shall be cleaned, pretreated and coated in accordance with the manufacturers normal production method and procedure. All coating weights used on test specimens shall be documented and representative of the individual manufacturer’s normal production material.
2.4 — At the end of the coating cycle, the specimen(s) shall be removed from the coating system in such a manner as to avoid any contact with the coated surface by any other object. The coated surface of the specimen shall not be handled or come in contact with other objects in such a way as to disrupt the coated surface.
2.5 — Specimens shall be allowed to age at an ambient room temperature, for a minimum 72 hour duration, before any testing commences.
3. Testing
3.1 Salt Spray Test
Apparatus – The apparatus used for salt spray testing shall be of such design as to conform to ASTM B117.
Test performance – Salt spray testing shall be conducted as specified in ASTM B117 for a test period of 120 continuous hours. The test specimen shall be scribed in accordance with ASTM D1654, section 6.1.
3.2 Condensation Testing (Humidity)
Apparatus – The apparatus used for condensation (humidity) testing shall be of such design as to conform to ASTM D4585 / D4585M.
Test performance – Condensation (humidity) testing shall be conducted as specified in ASTM D4585 / D4585M for a test period of 480 continuous hours. Exposure temperatures shall be maintained at a minimum of 100°F (38°C). To ensure adequate condensation, maintain at least a 20°F differential between the room and the vapor. Actual test temperature shall be noted in the report.
3.3 Accelerated Weathering Test
Apparatus – The apparatus used for accelerated weathering testing shall be of such design as to conform to ASTM G154. The bulb type used shall be a UVA340.
Test performance – Accelerated weathering testing shall be conducted as specified in ASTM D4587, for a test period of 300 hours duration. The cycle schedule for operating this type of equipment shall be 18 hours of light exposure at 140°F (60°C) followed by a 6 hour condensat ion cycle at 120°F (49°C).
3.4 Impact Test
The coating shall be tested per ASTM D2794 with 20-inch pounds of direct impact using a Gardner Impact Tester with a 1/2″ diameter ball or punch at room temperature of 70°-75°F (21°C-24°C). The test specimen shall be impacted at three locations on the panel that have a dry film thickness within the tolerance range for the coating process. Apply one-inch wide, #600 Scotch cellophane pressure-sensitive tape firmly to the impact area and pull off sharply.
NOTE: In order to ensure adhesion #600 Scott cellophane pressure sensitive tape must be stored and used within self life, as recommended by the manufacturer.
3.5 Film Adhesion Test
The coating film adhesion shall be tested in accordance with method “B” of ASTM D3359. A total of (11) parallel cuts are made with a sharp instrument, 0.039″ apart in both a vertical and horizontal direction forming a grid. One-inch wide #600 Scotch cellophane pressure-sensitive tape is then firmly applied to the scribed surface and pulled off sharply.
NOTE: In order to ensure adhesion #600 Scott cellophane pressure sensitive tape must be stored and used within self life, as recommended by the manufacturer.
3.6 Abrasion Test
The coating film shall be tested with a Taber Abraser Testing Apparatus using a No. CS-10 Resilient Calibrase Wheel in accordance with ASTM D4060. The specimen shall be run for a maximum of 1000 cycles, or until breakthrough of the finish coating occurs.
4. Acceptance Criteria
4.1 Salt Spray Resistance
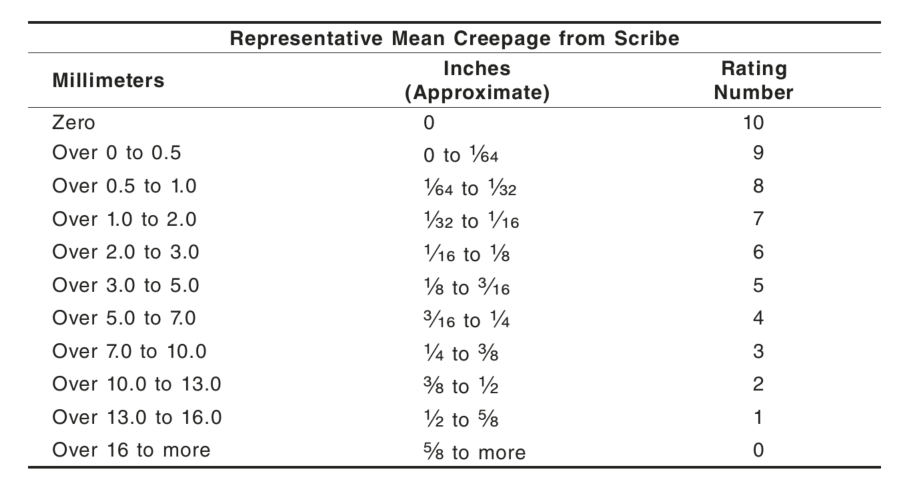
The coating film on the unscored surface of the test specimen shall have a rust grade of no less than 6 as defined in ASTM D610. See Table 1 and Figure 1 herein for evaluation of the rust grades. The coating film at the scribe line shall not be undercut by rust more than 1/8″ or a Rating Number 6 on each side of the scribe line when evaluated in accordance with ASTM D1654. See Table 2 herein, “Rating of Failure at Scribe (Procedure A)”.
4.2 Condensation Resistance
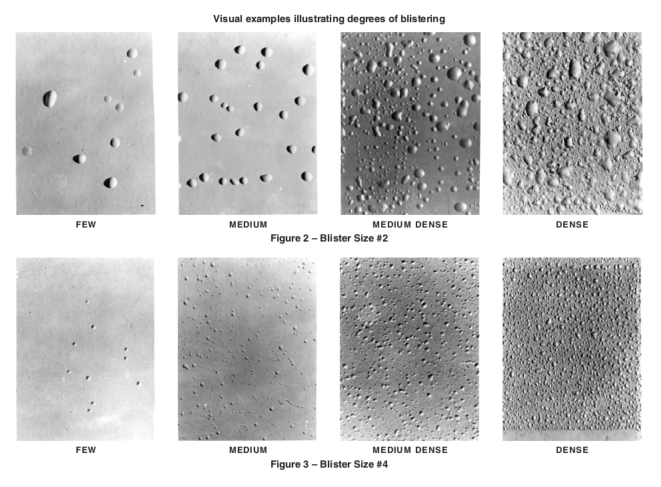
The coating film shall be allowed to exhibit the dense pattern of #8 blisters, but shall have no more than the “few” pattern of #6 blisters as illustrated in the photographic reference ASTM D714. See Figures 2 through 5 for visual representations of the various degrees of blistering.
4.3 Accelerated Weathering Resistance
When tested in accordance with Paragraph 3.3 herein, the paint film shall exhibit the following traits:
4.3.1 — No rust, checking, cracking, erosion or flaking shall be present.
4.3.2 — No more than a few pattern of #6 blisters as illustrated in the phtographic reference ASTM D714. Visual representations of the various degrees of blistering are shown in Figures 2 through 5 herein.
4.3.3 — A degree of chalking not to exceed “visible” as described in test method B of ASTM D4214.
4.3.4 — No more than a 50% decrease in gloss when tested in accordance with ASTM D523.
4.3.5 — No more than a 10% change in color (fade) when tested in accordance with ASTM D2244.
4.4 Impact Test
No coating film removal shall occur other than at an area 1/8″ in diameter at the center of the impact area, when tested in accordance with Paragraph 3.4 herein.
4.5 Film Adhesion
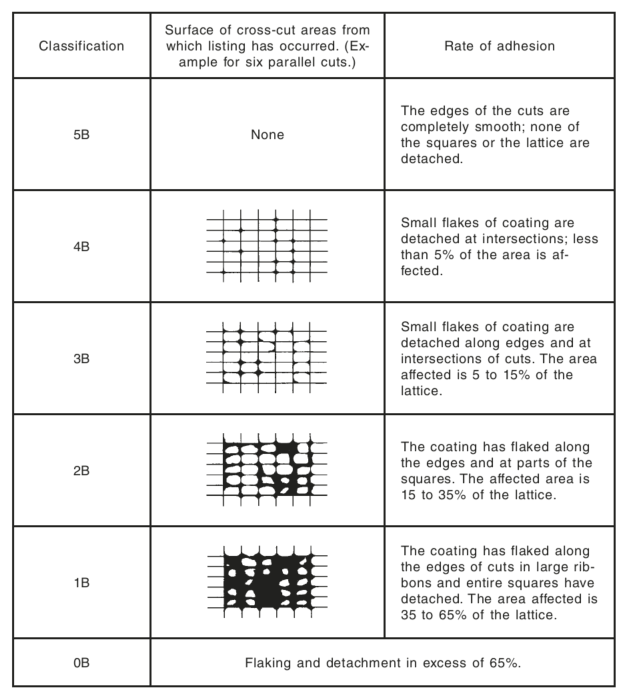
There shall be no adhesion loss less than a grade 3B as defined in ASTM D3359. This grade represents a film removal of between 5 and 15%. Table 3 herein illustrates the various classifications for adhesion loss.
4.6 Abrasion Resistance
The coating film shall have a wear index of 100 (.10 mg weight loss per cycle) or less when tested in accordance with Paragraph 3.6 herein. The wear index shall be calculated using the actual number of cycles to which the specimen was subjected.
5. Report
5.1 — The report shall cover the date the test was performed and the issue date of the report .
5.2 — Identification of the specimen tested, source of supply, manufacturer, model or series number, or both, and any other pertinent information.
5.3 — A detailed description of the specimen or specimens tested shall include the type of prime or barrier coating if used, the method of coating application, the procedure used to cure it and the dry film thickness.
5.4 — Any modifications made on the test specimen to obtain the values of acceptance shall be noted and described in detail in the report.
5.5 — The report shall include the statement: “Finish coating has been tested in accordance with the methods and procedures specified in ANSI/SDI A250.3.” If deviations from the text methods and procedures specified in this standard were made, they shall be described in the report.
5.6 — When the test is conducted to check the conformance of the unit specimen to test requirements of a particular specification, the identification or description of the specification shall be included in the report.
Tables
Table 1 – Rust Grades
Rust Grade | Maximum % of Rusted Area |
| 10 | 00.01 |
| 9 | 00.03 |
| 8 | 00.10 |
| 7 | 00.30 |
| 6 | 01.00 |
| 5 | 03.00 |
| 4 | 10.00 |
| 3 | 16.67 |
| 2 | 33.33 |
| 1 | 50.00 |
| 0 | 100.00 |
Table 2 – Rating of Failure at Scribe (Procedure A)

Table 3 – Classification of Adhesive Test Results

Figures
Figure 1 – Visual Reference for Percentage of Rust

Figures 2 & 3 – Blister Size #2 & Blister Size #4

Figures 3 & 4 – Blister Size #6 & Blister Size #8

