American National Standard
Test Procedure and Acceptance Criteria for Prime Painted Steel Surfaces for Steel Doors & Frames
ANSI/SDI A250.10-2025
View PDF
1. General
1.1 Scope
These methods prescribe the procedures to be followed in the selection of material, chemical preparation of the steel substrate, prime paint coating application, testing, and evaluation of prime painted steel surfaces for steel doors and frames.
1.2 Testing Laboratory
All tests shall be conducted by an accredited laboratory.
1.3 Referenced Documents
- ASTM B117-19 — Standard Practice for Operating Salt Spray (Fog) Apparatus
- ASTM D610-08 (2019) — Standard Practice for Evaluating Degree of Rusting on Painted Steel Surfaces
- ASTM D714-25 — Standard Test Method for Evaluating Degree of Blistering of Paints
- ASTM D1654-08 (2016)e1 — Standard Test Method for Evaluation of Painted or Coated Specimens Subjected to Corrosive Environments
- ASTM D2794-93 (2024) — Standard Test Method for Resistance of Organic Coatings to the Effects of Rapid Deformation (Impact)
- ASTM D3359-23 — Standard Test Methods for Rating Adhesion by Tape Test
- ASTM D4585 / D4585M-18 — Standard Practice for Testing Water Resistance of Coatings Using Controlled Condensation
2. Material
2.1 The test specimen shall be of the ASTM specification per ANSI/SDI A250.8 as used in the manufacturing of the products. Separate specimens shall be used for each test. The specimen shall be a minimum 4″ x 6″ with a 1/4″ hole at the center of the 4″ width, 1/2″ in from the end. Identification marks shall be added to the specimen as required for control purposes. The test specimen shall be handled at all stages of the process with clean gloves to prevent contamination.
2.2 The specimen(s) shall be hung using a method representative of that used in production.
2.3 The specimen(s) shall be cleaned, pre-treated and prime painted in accordance with the manufacturer’s normal production method and procedure. All dry fill thickness used on test specimens shall be documented and representative of the individual manufacturer’s normal production material.
2.4 At the end of the coating cycle, the specimen(s) shall be removed from the system in such a manner as to avoid any contact with the primed surface by any other object. The primed surface of the specimen shall not be handled or come in contact with other objects in such a way as to disrupt the primed surface.
2.5 All specimens shall be allowed to age at ambient room temperature, for a minimum of 72 hour duration before any testing commences.
3. Testing
3.1 Salt Spray Test
a) Apparatus — The apparatus used for salt spray testing shall be of such design as to conform to ASTM B117.
b) Test performance — Salt spray testing shall be conducted as specified in ASTM B117 for a test period of 120 continuous hours. The test specimen(s) shall be scribed with an “X” per ASTM D1654, section 6.1.
3.2 Condensation Test (Humidity)
a) Apparatus — The apparatus used for condensation (humidity) testing shall be of such design as to conform to ASTM D4585 / D4585M.
b) Test performance — Condensation (humidity) testing shall be conducted as specified in ASTM D4585 / D4585M for a test period of 240 continuous hours. Exposure temperatures shall be maintained at a minimum of 100° Farenheit (38° C). To ensure adequate condensation, maintain at least 20° F (-7° C) differential between the room and the vapor. Actual test temperature shall be noted in the report.
3.3 Impact Test
The prime paint coating shall be subject to one impact per ASTM D2794 with 20 inch pounds of direct impact using a Gardner Impact Tester with 1/2″ (12.7mm) diameter ball or punch at room temperature of 70° – 75° Fahrenheit. Apply one-inch (25.4mm) wide #600 Scotch cellophane pressure-sensitive tape firmly to the impact area and pull off sharply.
NOTE: In order to ensure adhesion #600 Scotch cellophane pressure sensitive tape must be stored and used within shelf life, as recommended by the manufacturer.
3.4 Film Adhesion Test
The prime coating film adhesion shall be tested in accordance with method “B” of ASTM D3359.
A total of (11) parallel cuts are made with a sharp instrument, 0.039” apart in both a vertical and horizontal direction, forming a grid.
One inch wide pressure-sensitive tape is then firmly applied to the scribed surface and pulled off sharply.
NOTE: In order to ensure adhesion #600 Scotch cellophane pressure sensitive tape must be stored and used within shelf life, as recommended by the manufacturer.
4. Acceptance Criteria
4.1 Salt Spray Resistance
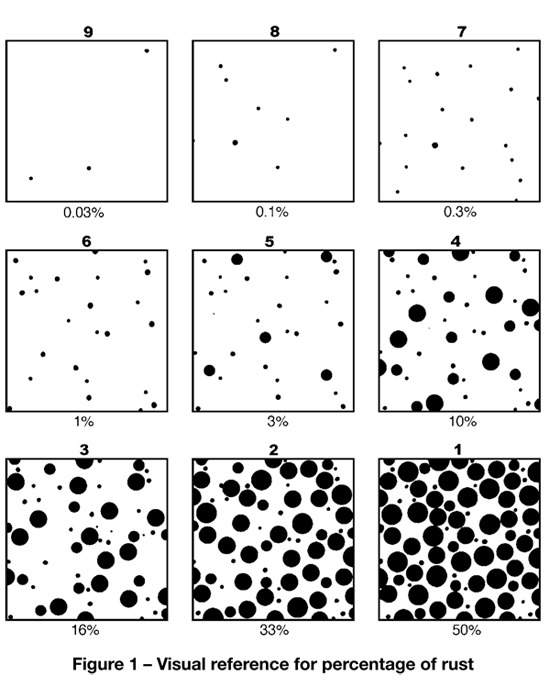
Applied prime paint on the unscored surface of the test specimen shall have a rust grade of no less than 6 as defined in ASTM D610.
Table 1 and the depictions shown in Figure 1 illustrate the scale used to evaluate the rust grades. The painting film at the scribe line shall not be undercut by rust more than 1/8″ each side, when tested in accordance with paragraph 3.1 (or a Rating Number 6 on each side of the scribe line, when evaluated and rated in accordance with ASTM D1654, Table 1. “Rating of Failure at Scribe (Procedure A).”).
Table 1- Rust Grades
| Rust Grade | Maximum % of Rusted Area |
|---|---|
| 10 | 00.01 |
| 9 | 00.03 |
| 8 | 00.10 |
| 7 | 00.30 |
| 6 | 01.00 |
| 5 | 03.00 |
| 4 | 10.00 |
| 3 | 16.00 |
| 2 | 33.00 |
| 1 | 50.00 |
| 0 | 100.00 |
4.2 Condensation Resistance
Applied prime paint shall be allowed to exhibit the dense pattern of #8 blisters but, shall have no more than the “few” pattern of #6 blisters as illustrated in the photographic reference of ASTM D714. See Figures 2 through 5 herein for visual representations of the various degrees of blistering.
Testing shall be in accordance with paragraph 4.2 of ASTM D714.
4.3 Impact Test
No prime paint coating film removal shall occur other than at an area 1/8″ in diameter at the center of the impact area, when tested in accordance with paragraph 3.3.
4.4 Film Adhesion
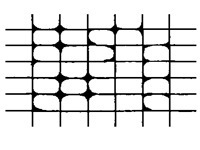
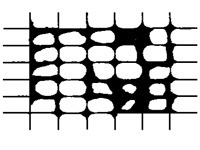
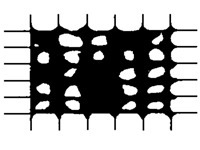
There shall be no adhesion loss less than a grade 3B as defined in ASTM D3359. This grade represents a film removal of between 5% and 15%. Table 2 illustrates the various classifications for adhesion loss.
5. Report
5.1 The report shall cover the date the test was performed and the issue date of the report.
5.2 Identification of the specimen tested, source of supply, manufacturer, model or series number, or both, and any other pertinent information.
5.3 A detailed description of the specimen or specimens tested shall include the type of prime paint, the method of paint application and the procedure used to cure it, the dry film thickness and the ASTM grade of the steel substrate.
5.4. Any modifications made on the test specimin to obtain the values of acceptance shall be noted and described in detail in the report.
5.5 The report shall include the statement: “Prime paint has been tested in accordance with the methods and procedures specified in ANSI/SDI A250.10.” If deviations from the test methods and procedures specified in this standard were made, they shall be described in the report.
5.6 When the test is conducted to check the conformance of the unit specimin to the test requirements of a particular specification, the identification or description of the specification shall be included in the report.


Table 2 – Classification of Adhesive Test Results
| Classification | Surface of cross-cut areas from which listing has occurred. (Example for six parallel cuts.) | Rate of adhesion |
|---|---|---|
| 5B | None | The edges of the cuts are completely smooth; none of the squares or the lattice are detached. |
| 4B |  | Small flakes of coating are detached at intersections; less than 5% of the area is affected. |
| 3B |  | Small flakes of coating are detached along edges and at intersections of cuts. The area affected is 5 to 15% of the lattice. |
| 2B |  | The coating has flaked along the edges and at parts of the squares. The affected area is 15 to 35% of the lattice. |
| 1B |  | The coating has flaked along the edges of cuts in large ribbons and entire squares have detached. The area affected is 35 to 65% of the lattice. |
| 0B | Flaking and detachment in excess of 65%. | |

